This tool allows you to create a bevel on: · the edge of a surface or a volume (edge mode).
The Chamfer tool will create internal or external bevels, depending on the orientation of the edges of the model. You will be able to create bevels of variable radius. |
|
|
|
|
|
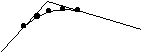
Chamfer applied to a curve |
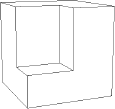
Volume not beveled |
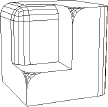
Chamfer applied to a volume |
POINT mode: This chamfer style creates arcs around each selected point and creates a curved surface between these arcs. The edges are not modified (they are just shorter close to the chamfered points). For example, the rounded corners of a die could be created using this chamfer style.
EDGE mode: This chamfer style replaces the selected edges by cylindrical parts; each end of the edge is replaced by an arc and a ruled surface is built within these arcs. At points that share two or more chamfered edges, the results could look like point mode chamfering.
![]()
The Chamfer tool does not work on NURBS objects. However, you can convert a NURBS object into a polygonal object using the Information tool of the Control Panel. (See chapter User Manual/Modeling help tools / Control panel/ Information). Keep in mind that once a NURBS object is converted to a polygonal object, it cannot be converted back into a NURBS object.
![]()
This tool does not use Dynamic Geometry properties. In fact, it will delete the D.G. properties (if any) of your object, and you will no longer be able to use the features of D.G. to modify your object. (Amapi 3D will not display the palette described above for this object).If you want your object to retain its D.G. properties, do not use any of these tools on it.See chapter User Manual/The objects/Dynamic Geometry).
Usage:
1. Selecting the Chamfer tool.
· Click on the icon depicting the tool in the palette. Amapi 3D displays a palette for this tool.
|
|
|
|
|
Off/On |
Off/On |
Off/On |
Off/On |
Toggle |
Create a chamfer on an edge |
Create a chamfer on a point |
Modify the chamfer radius on a point |
Delete the chamfers on a selection |
Display Contour / Wireframe |
2. Create a chamfer on an edge.
![]()
Click on the “Create a chamfer on an edge” icon.
The default selection tool is the Lasso. You can change the cursor to the edge selector if desired.
· Lasso selection:
· Surround the group of edges to be chamfered, then validate.
· Repeat this operation as many times as necessary.
· Edge selector selection:
· Click on the edge to be chamfered.
· Repeat this operation as many times as necesssary.
![]()
Selection is a toggle. If you select an edge or a group of edges already selected, they will be deselected.
· Minimum angle value selection:
The data palette displays the radius, the range, and an angle. There are two ways to set an angle value (see step 4).
Amapi 3D will immediately select all the edges of the faces from which the angle value is greater than the set angle value (like the smoothing break angle).
3. Create a chamfer on points.
![]()
Click on the “Create a chamfer on a point” icon.
The default selection tool is the Bullseye. You can change the cursor to the Lasso if desired.
· Bullseye selection:
· Click on the point to be chamfered.
· Repeat this operation as many times as necessary.
· Lasso selection:
· Surround the group of points to be chamfered, then validate. Repeat this operation as many times as necessary.
![]()
Selection is a toggle. If you select an edge or a group of edges already selected, they will be deselected.
![]()
If you select the vertex of an edge already chamfered, the chamfer of this edge will be sharp on the selected vertex. If you don’t want to create this peak, reselect the vertex to deselect it.
4. Chamfer radius, range, and angle modification.
The data palette displays the radius, the range, and an angle. There are two ways to set these values:
· You can switch from one data to another by pressing the spacebar. The editable data appears darker. You may modify the value using the following methods:
· The tuner (“+” or “-” keys, or click on the “+” or “-” icons of the Assistant Palette)
· The Remote Control
· The Slider
· If you prefer, press the Tab key until you reach the data you want to edit, set a value and validate.
The radius
|
|
Chamfer with a small radius |
Chamfer with a bigger radius |
The chamfer range
| |||
Without
|
Range 0 Chamfer |
Range 1 Chamfer |
Range 2 Chamfer |
The angle
Set the angle value based on which Amapi 3D will select all the edges of the faces of which the angle value is greater than the set angle value (like the smoothing break angle).
5. Delete the chamfer on a selection.
![]()
If you want to delete the chamfer on a selected area, click on the “Delete the chamfers on a selection” icon. The cursor will turn into the Lasso and you may surround the area in which all the chamfered points and edges will become non-chamfered.
6. Toggle: Display Contour / Wireframe.
![]()
The “Display Contour / Wireframe” button allows you to shift between these two display modes.
7. Modify the chamfer radius on a point.
![]()
The chamfer radius is the same for the whole selection. You may specify a different radius for specified points of the object.
· Click on the “Modify the chamfer radius on a point” button
· Take the Lasso or the Bullseye in the Assistant Palette or use the shortcut (PC: Click on the right mouse button, Mac: Option-Click).
· Select the points on which you want a radius different from the one applied on the selection.
· Modify the radius of the selected points (see step 4).
· Deselect the modified points when the new applied radius is correct. To do this, re-select them with the Lasso or the Bullseye (the selection is a toggle).
· Eventually, return to step 2 or 3 to create other chamfers, or validate your work.
8. Chamfer validation.
To validate the chamfer, Press the Return key. Amapi 3D displays the selected object or part of the selected object completely chamfered.
![]()
If you don’t validate the chamfer, your tool will not be chamfered. However, Amapi 3D keeps all the data you have set in memory and you will recover it by re-entering in the Chamfer tool.
9. Ending the tool action.
Put the tool aside to end the action (depending on the interface). See chapter User Manual/Tools/Generic use of a tool/How do you end a tool action?